.svg)

Custom Field Types
These are the formats that can be validated in storing custom fields.
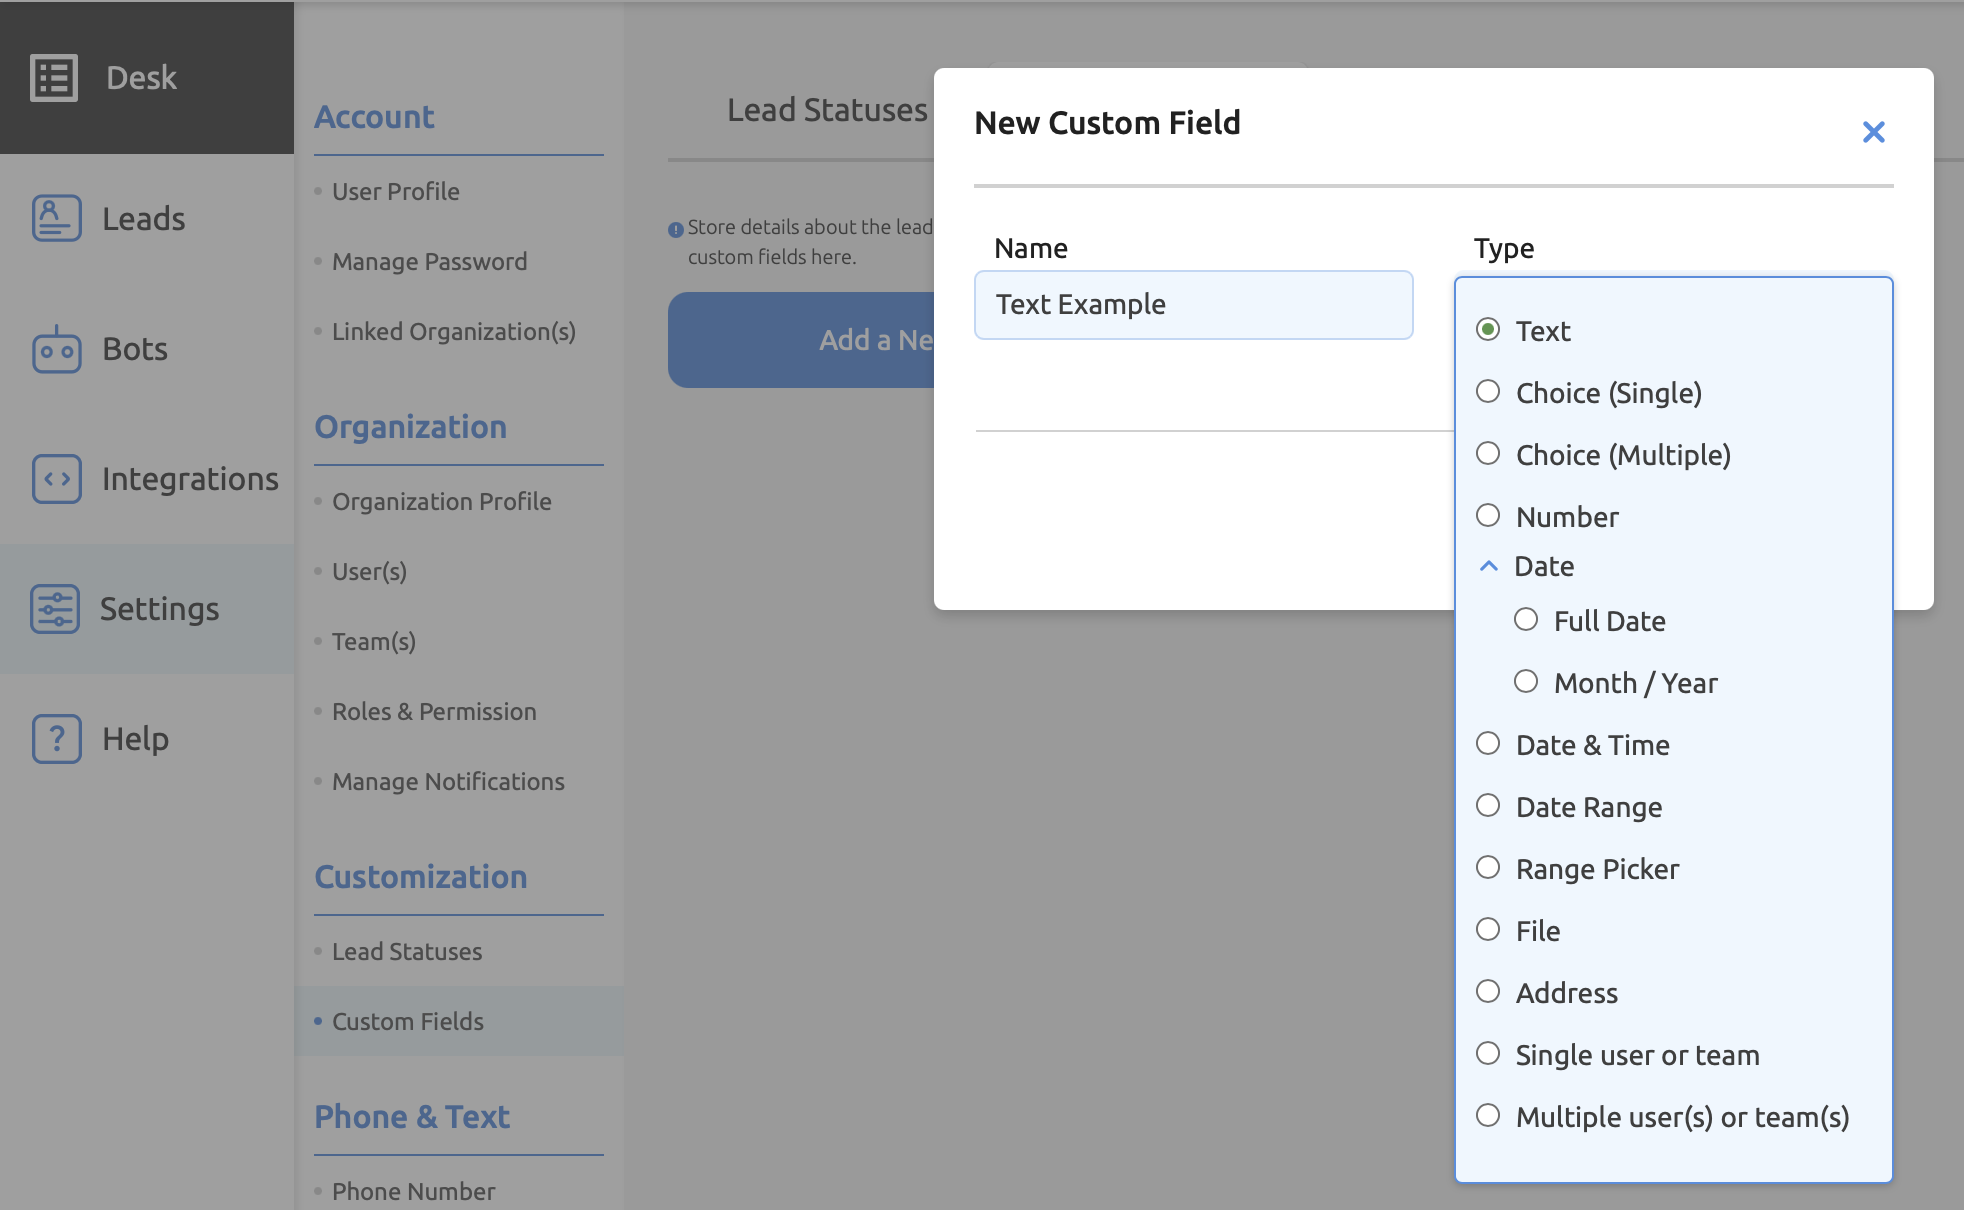
Text
Store plain text so that all of those details are accessible in one place, not spread out throughout your notes and various documents.
How to Add Text Custom Field:
1. Go to the "settings" section of the Intaker dashboard.
2. Select "custom fields."
3. Click the "add new" button to enter the name and field type as "text."
Remember to save. When you visit the lead profile, you will have the option to leave text notes under fields.
Caution:
The character limit is 1600.
Single Choice
Pick one value among preset multiple-choice options.
How to Add a Single Choice Custom Field:
1. Go to the "settings" section of the Intaker dashboard.
2. Select "custom fields."
3. Click the "add new" button to enter the name and field type as "choice (single)."
4. Type your choices in the provided text box and select "add."
Remember to save. Next time you visit the lead profile, the option will appear to select a single choice from the list.
Pro Tip:
A use case would be identifying the type of car from an accident for a personal injury case. The options could be Chevy, Toyota, Ford, etc. The user would only want to select one option. It saves the hassle of typing everything out.

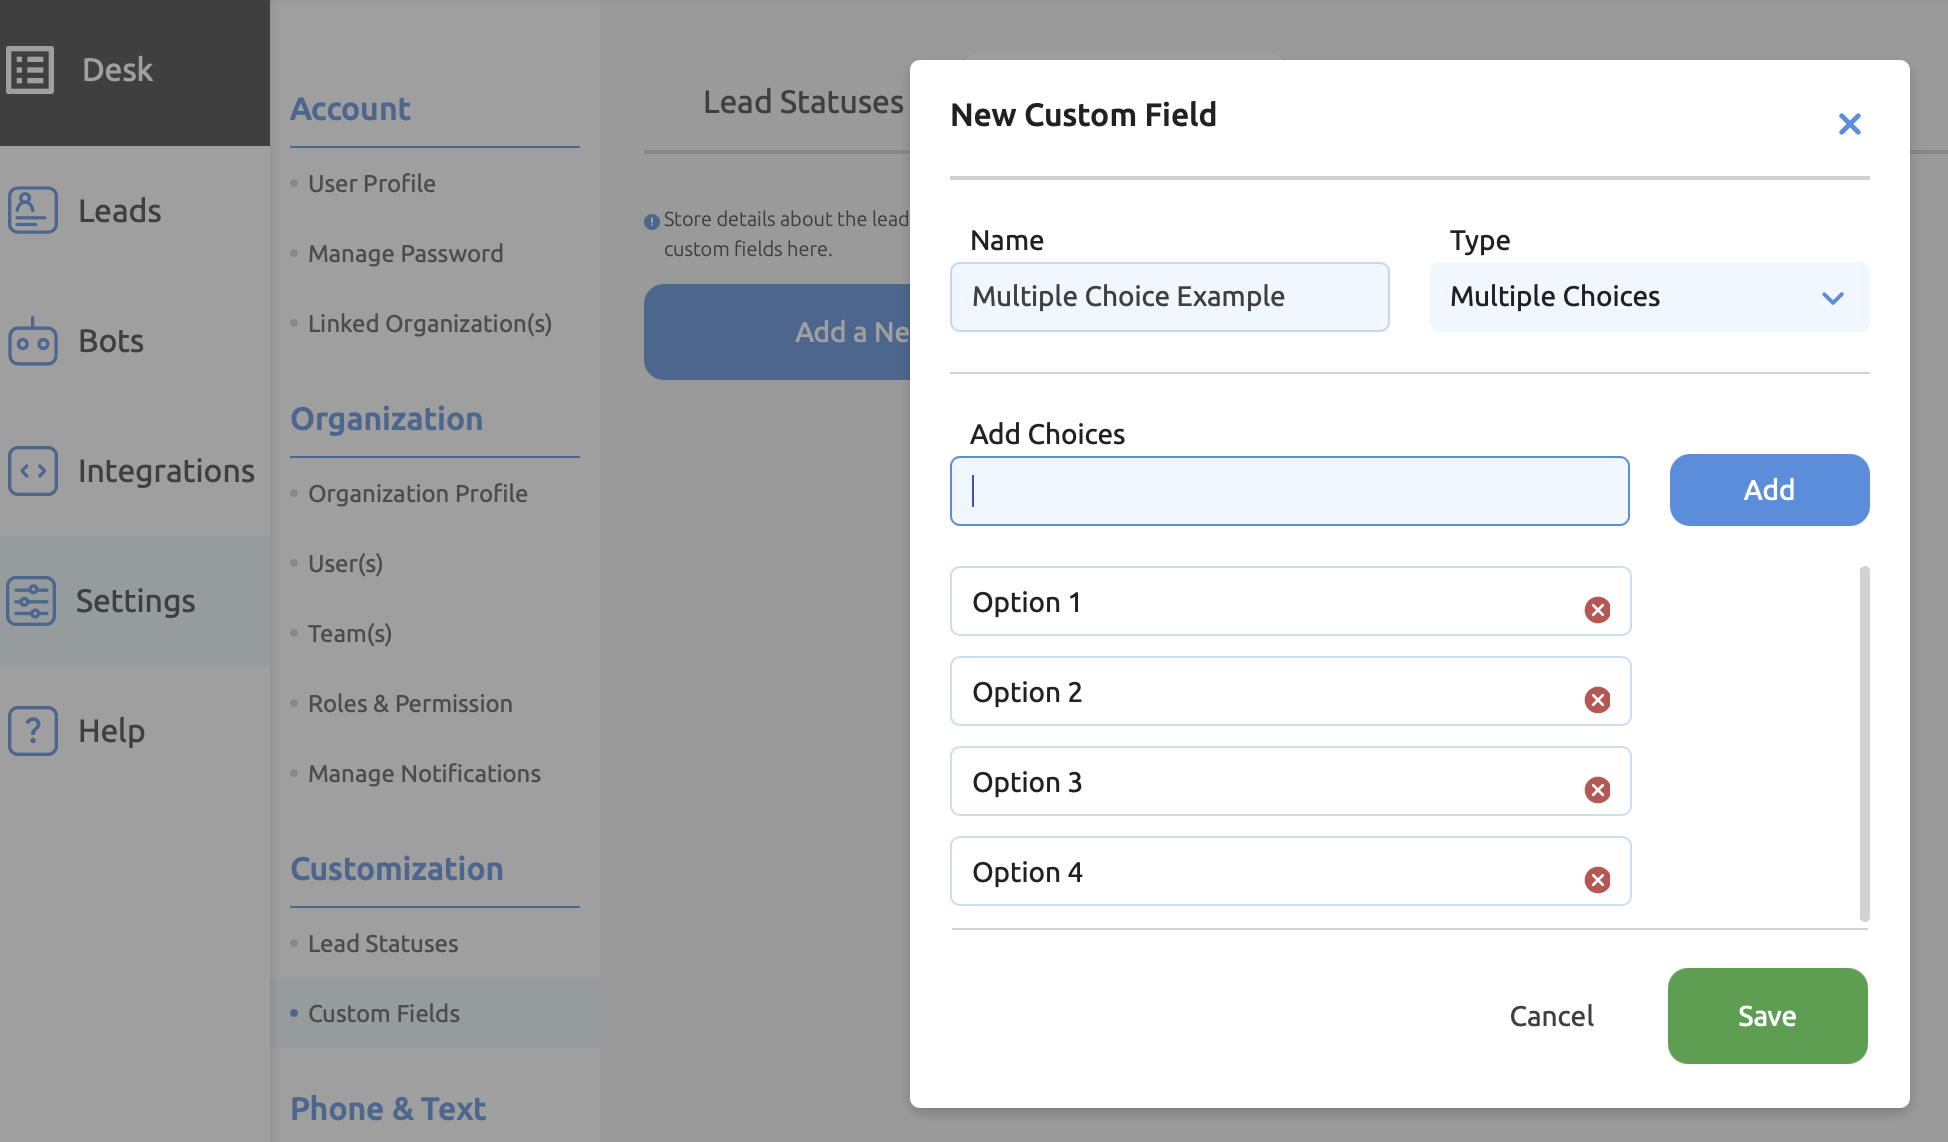
Multiple Choice
Pick multiple values among multiple preset options.
How to Add a Multiple Choice Custom Field:
1. Go to the "settings" section of the Intaker dashboard.
2. Select "custom fields."
3. Click the "add new" button to enter the name and field type as "choice (multiple)."
4. Type your choices in the provided text box and select "add."
Remember to save. Next time you visit the lead profile, the option will appear to select multiple choices from the list.
Pro Tip:
A use case for this might be if a personal injury attorney needs to know which part of your body was injured. There could be a long list of body parts, and they can select the left leg, right arm, lower back, etc.
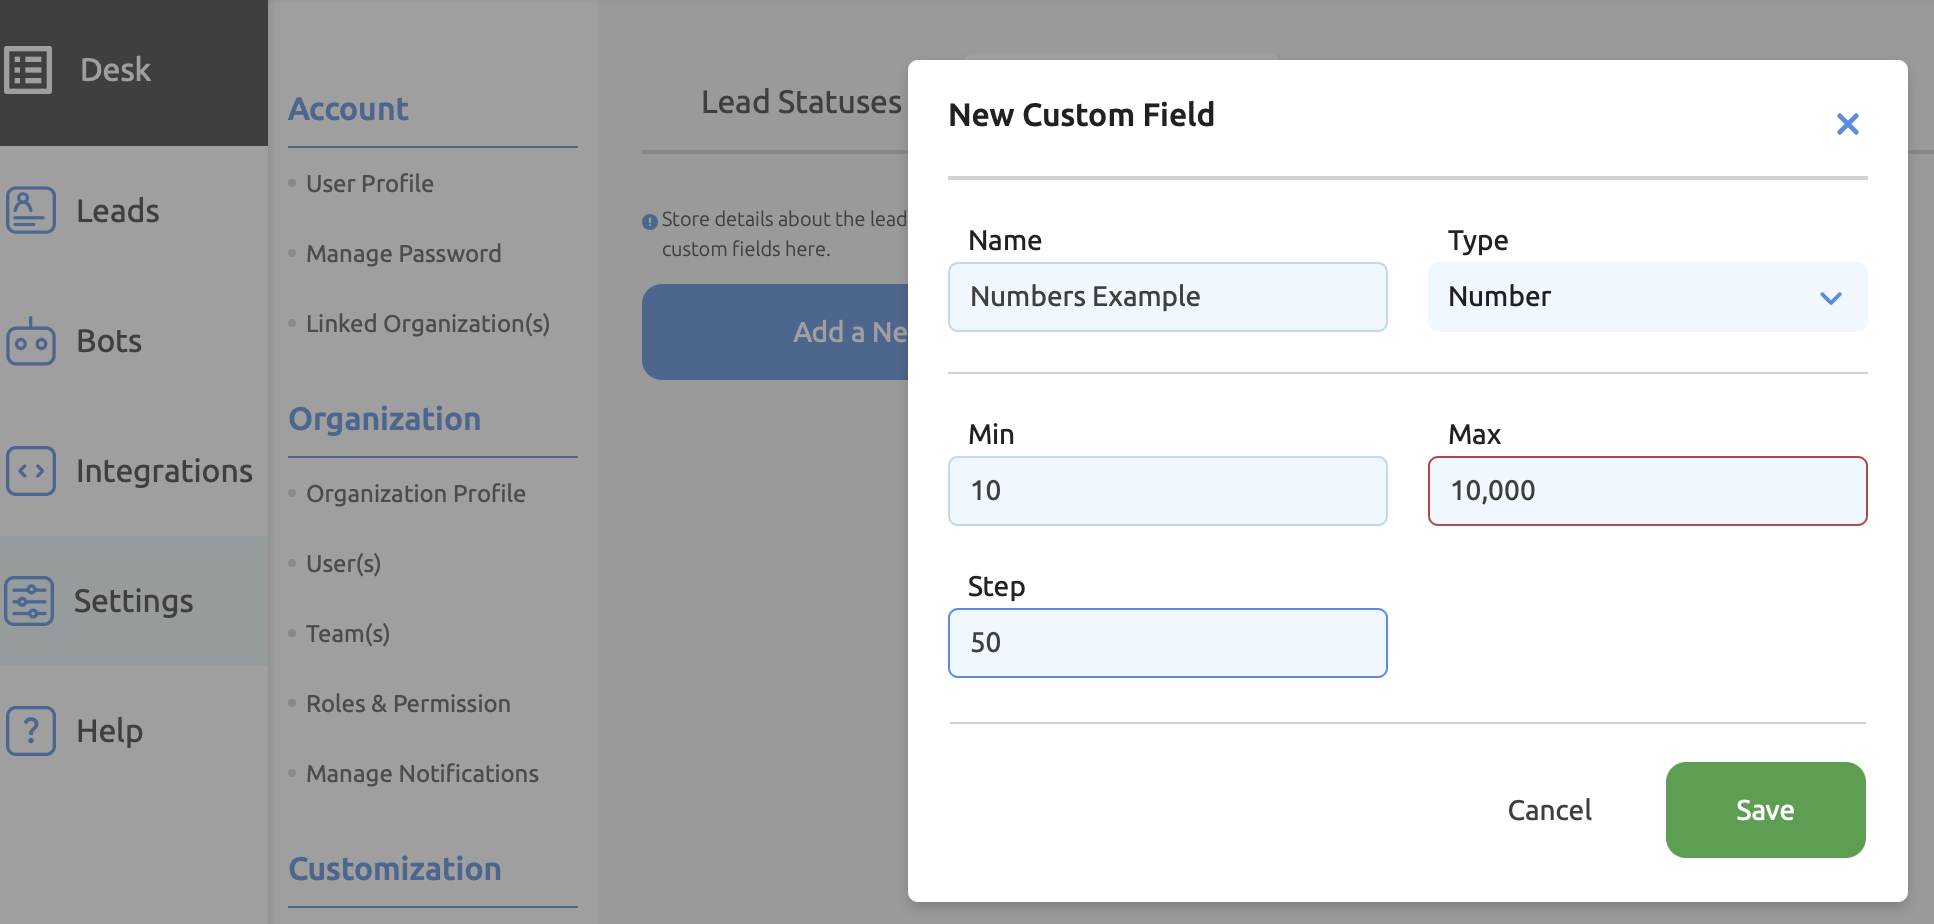
Numbers
Only accepts numbers.
How to Add a Custom Field for Numbers:
1. Go to the "settings" section of the Intaker dashboard.
2. Select "custom fields."
3. Click the "add new" button.
4. Name with a relevant title.
5. Select the field type as "number."
6. Enter a min-max numerical range and step (e.g., increments of 10, 50, 1000, etc.)
Remember to save. Next time you visit the lead profile, you will be able to add numbers using a slider with the preset range and step you designated.
[Insert photo of where you add all info to create the field + how you add to lead profile.]
Pro Tip:
There are many use cases for this; some examples are people in a household from 1 to 10 with 1 step. Or, you could enter household income from 10,000 to 200,000 with 5,000 steps.
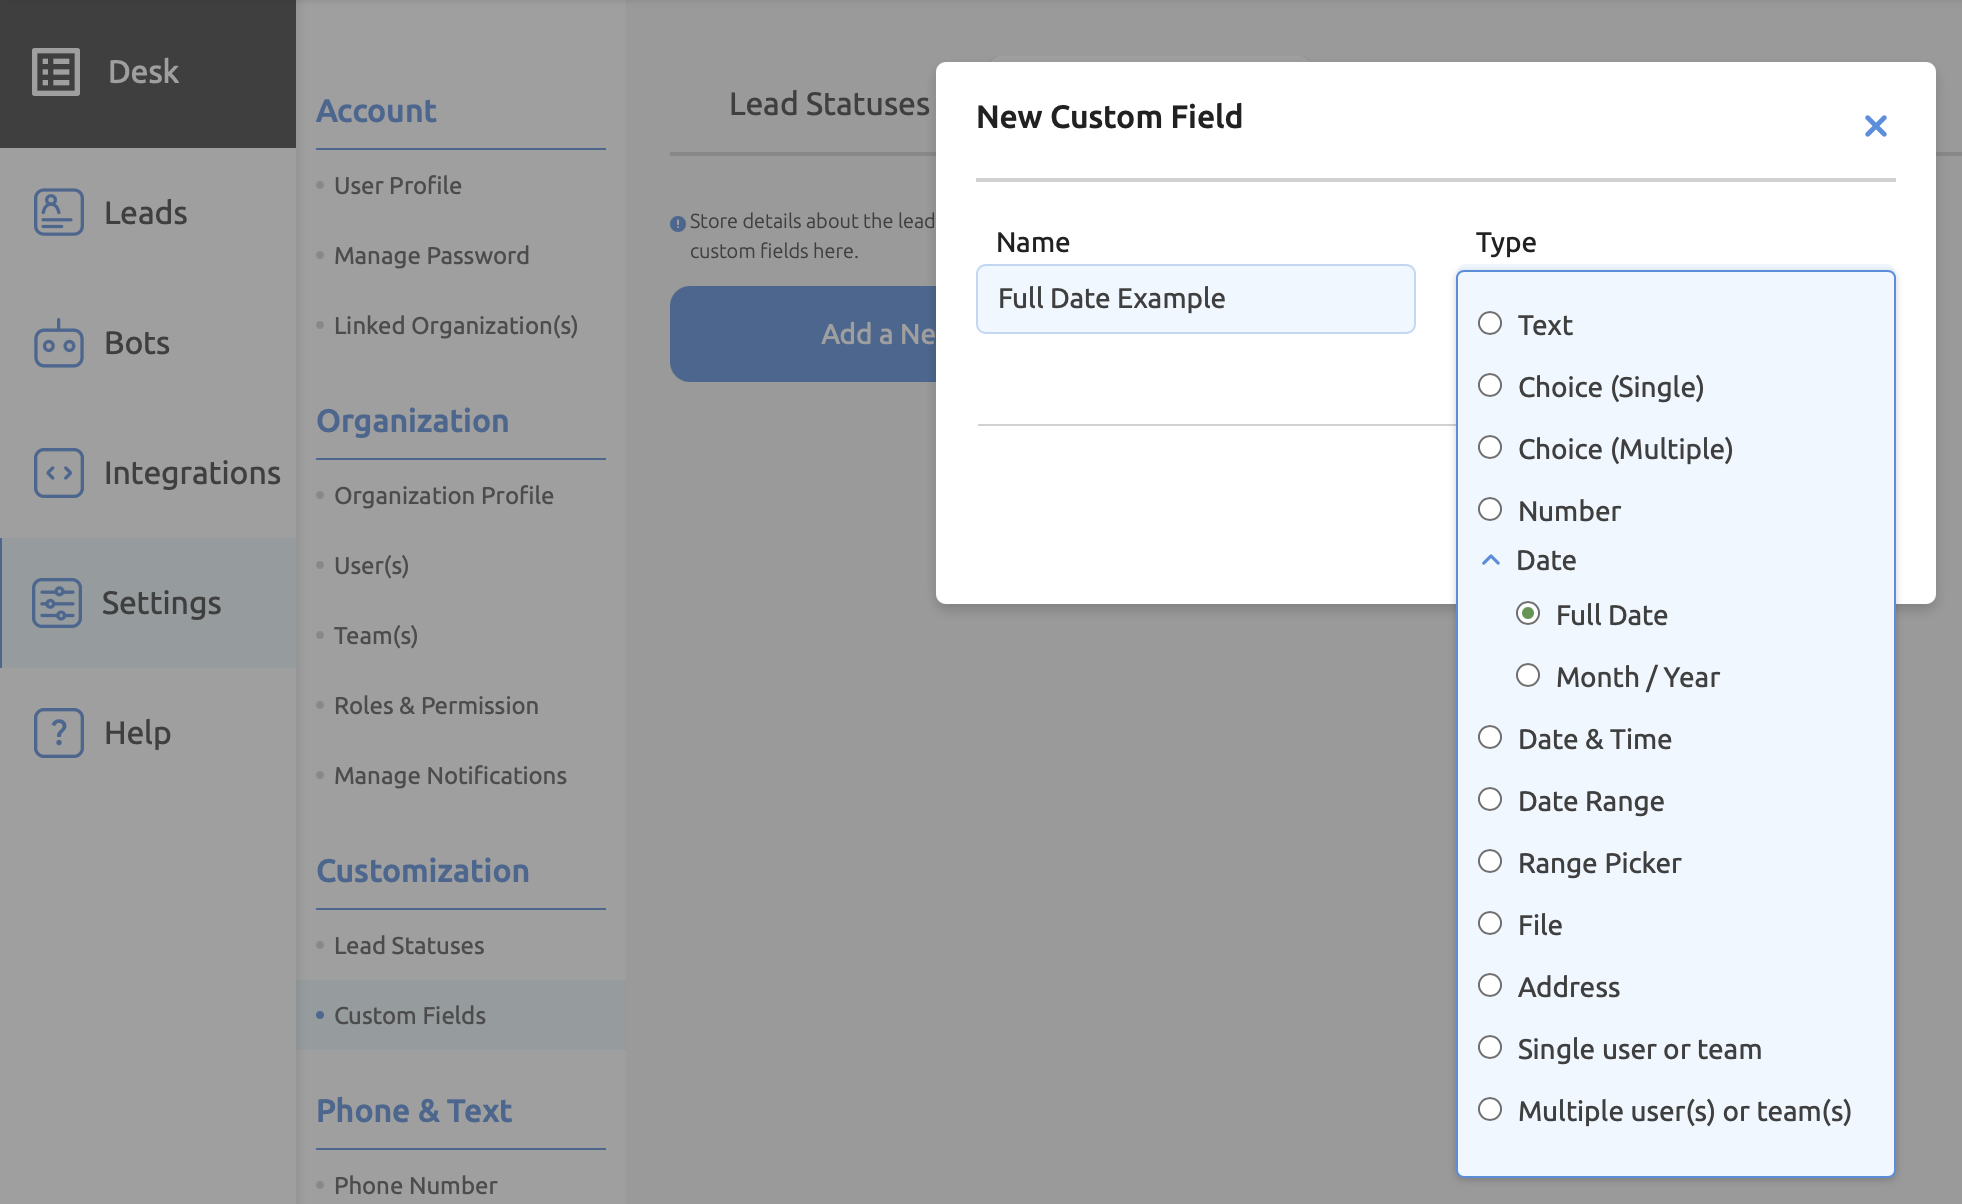
Full Date Custom Field
To display the day, month, and year.
How to Add a Full Date Custom Field:
1. Go to the "settings" section of the Intaker dashboard.
2. Select "custom fields."
3. Click the "add new" button to enter the name and field type as "full date."
Remember to save. Next time you visit the lead profile, you will be able to add date, month, and year to the custom field.
Date (Month/Year) Custom Field
It shows a simplified date, including the month and year.
How to Add a Date (Month/Year) Custom Field:
1. Go to the "settings" section of the Intaker dashboard.
2. Select "custom fields."
3. Click the "add new" button to enter the name and field type as "month/year."
Remember to save. Next time you visit the lead profile, you will be able to add the month and year of an event.

Date & Time Custom Field
Display the full date and time.
How to Add a Date & Time Custom Field:
1. Go to the "settings" section of the Intaker dashboard.
2. Select "custom fields."
3. Click the "add new" button to enter the name and field type as "date & time."
Remember to save. Next time you visit the lead profile, you will be able to add the date & time of an event.

Date Range
Show a period between two dates.
How to Add a Date Range Custom Field:
1. Go to the "settings" section of the Intaker dashboard.
2. Select "custom fields."
3. Click the "add new" button to enter the name and field type as "date range."
Remember to save. Next time you visit the lead profile, you will be able to add a date range.
Pro Tip:
A use case example would be a divorce lawyer needing the date range of the client's marriage on file.

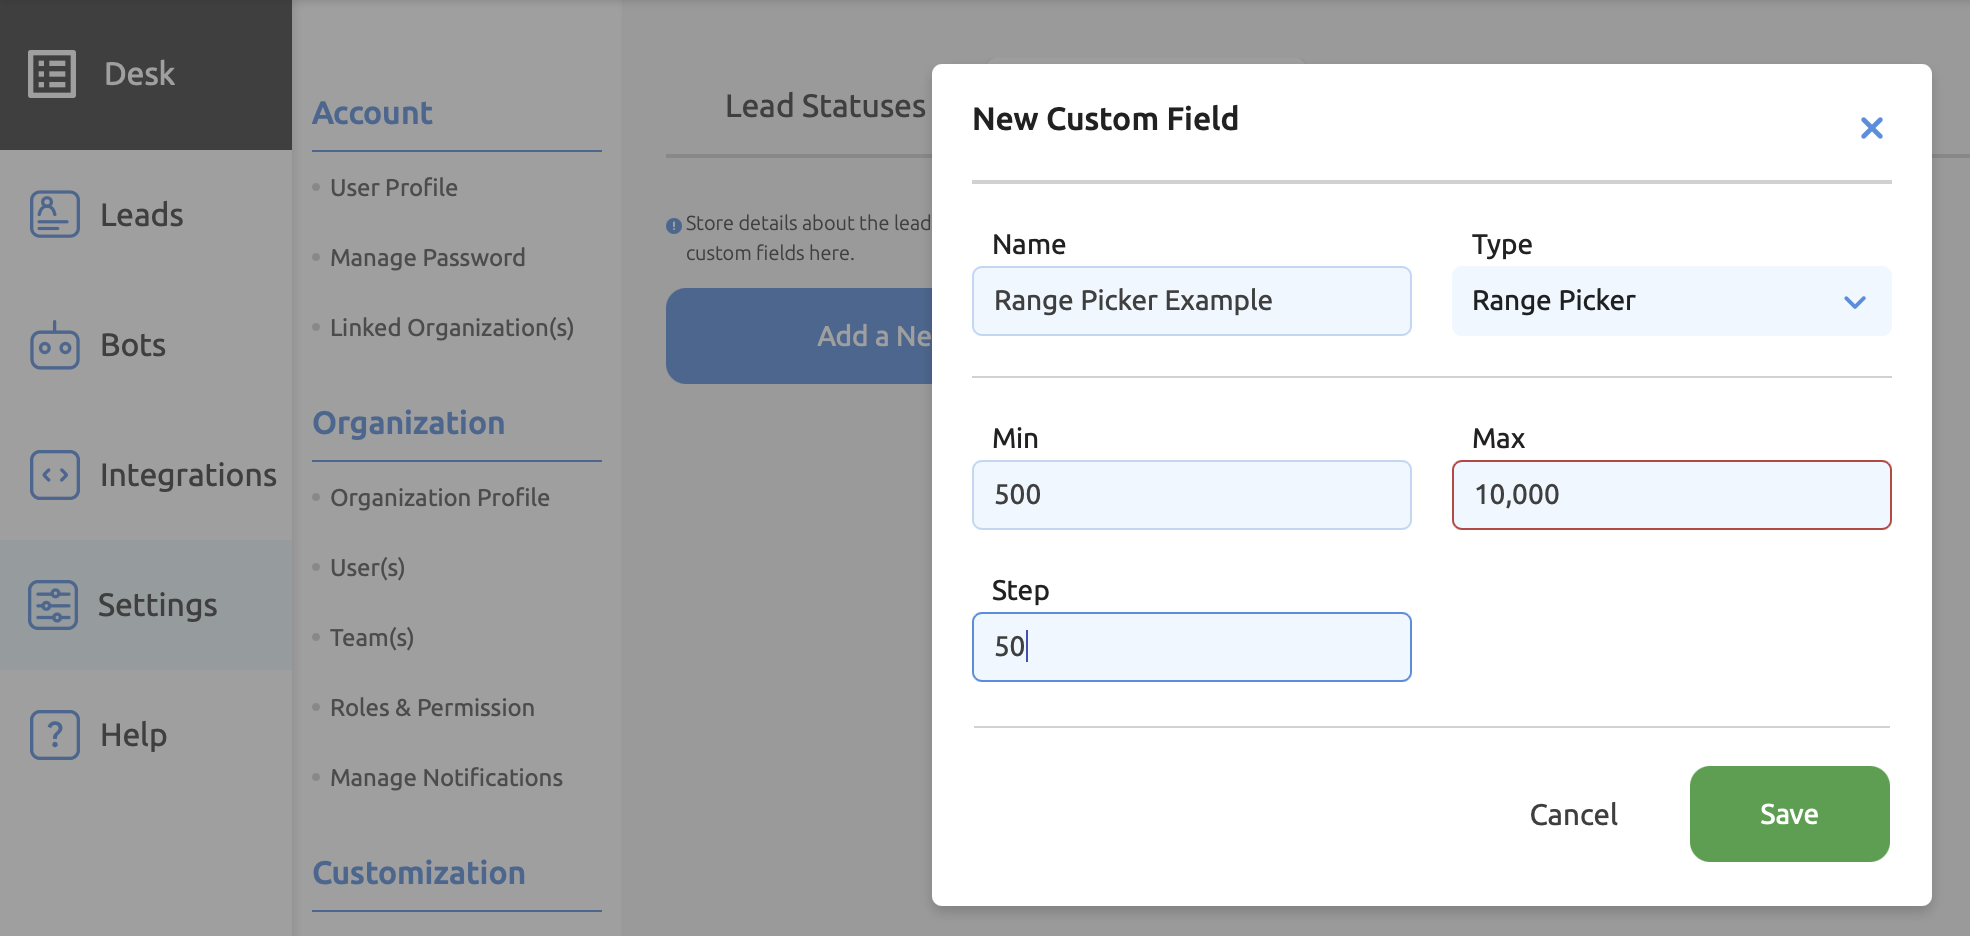
Range Picker
A numerical value between two preset numbers.
How to Add Range Picker as a Custom Field:
1. Go to the "settings" section of the Intaker dashboard.
2. Select "custom fields."
3. Click the "add new" button to enter the name and field type as "range picker."
4. Enter a min-max numerical range and step (e.g., increments of 10, 50, 1000, etc.)
Remember to save. Next time you visit the lead profile, you will be able to pick a range within the numerical amounts you chose during setup.
File
Store files for different purposes, PDF, Images, Docx, etc.
How to Create a Custom Field to Attach Files:
1. Go to the "settings" section of the Intaker dashboard.
2. Select "custom fields."
3. Click the "add new" button to enter the name and field type as "file."
Remember to save. Next time you visit the lead profile, you will be able to add files under custom fields.

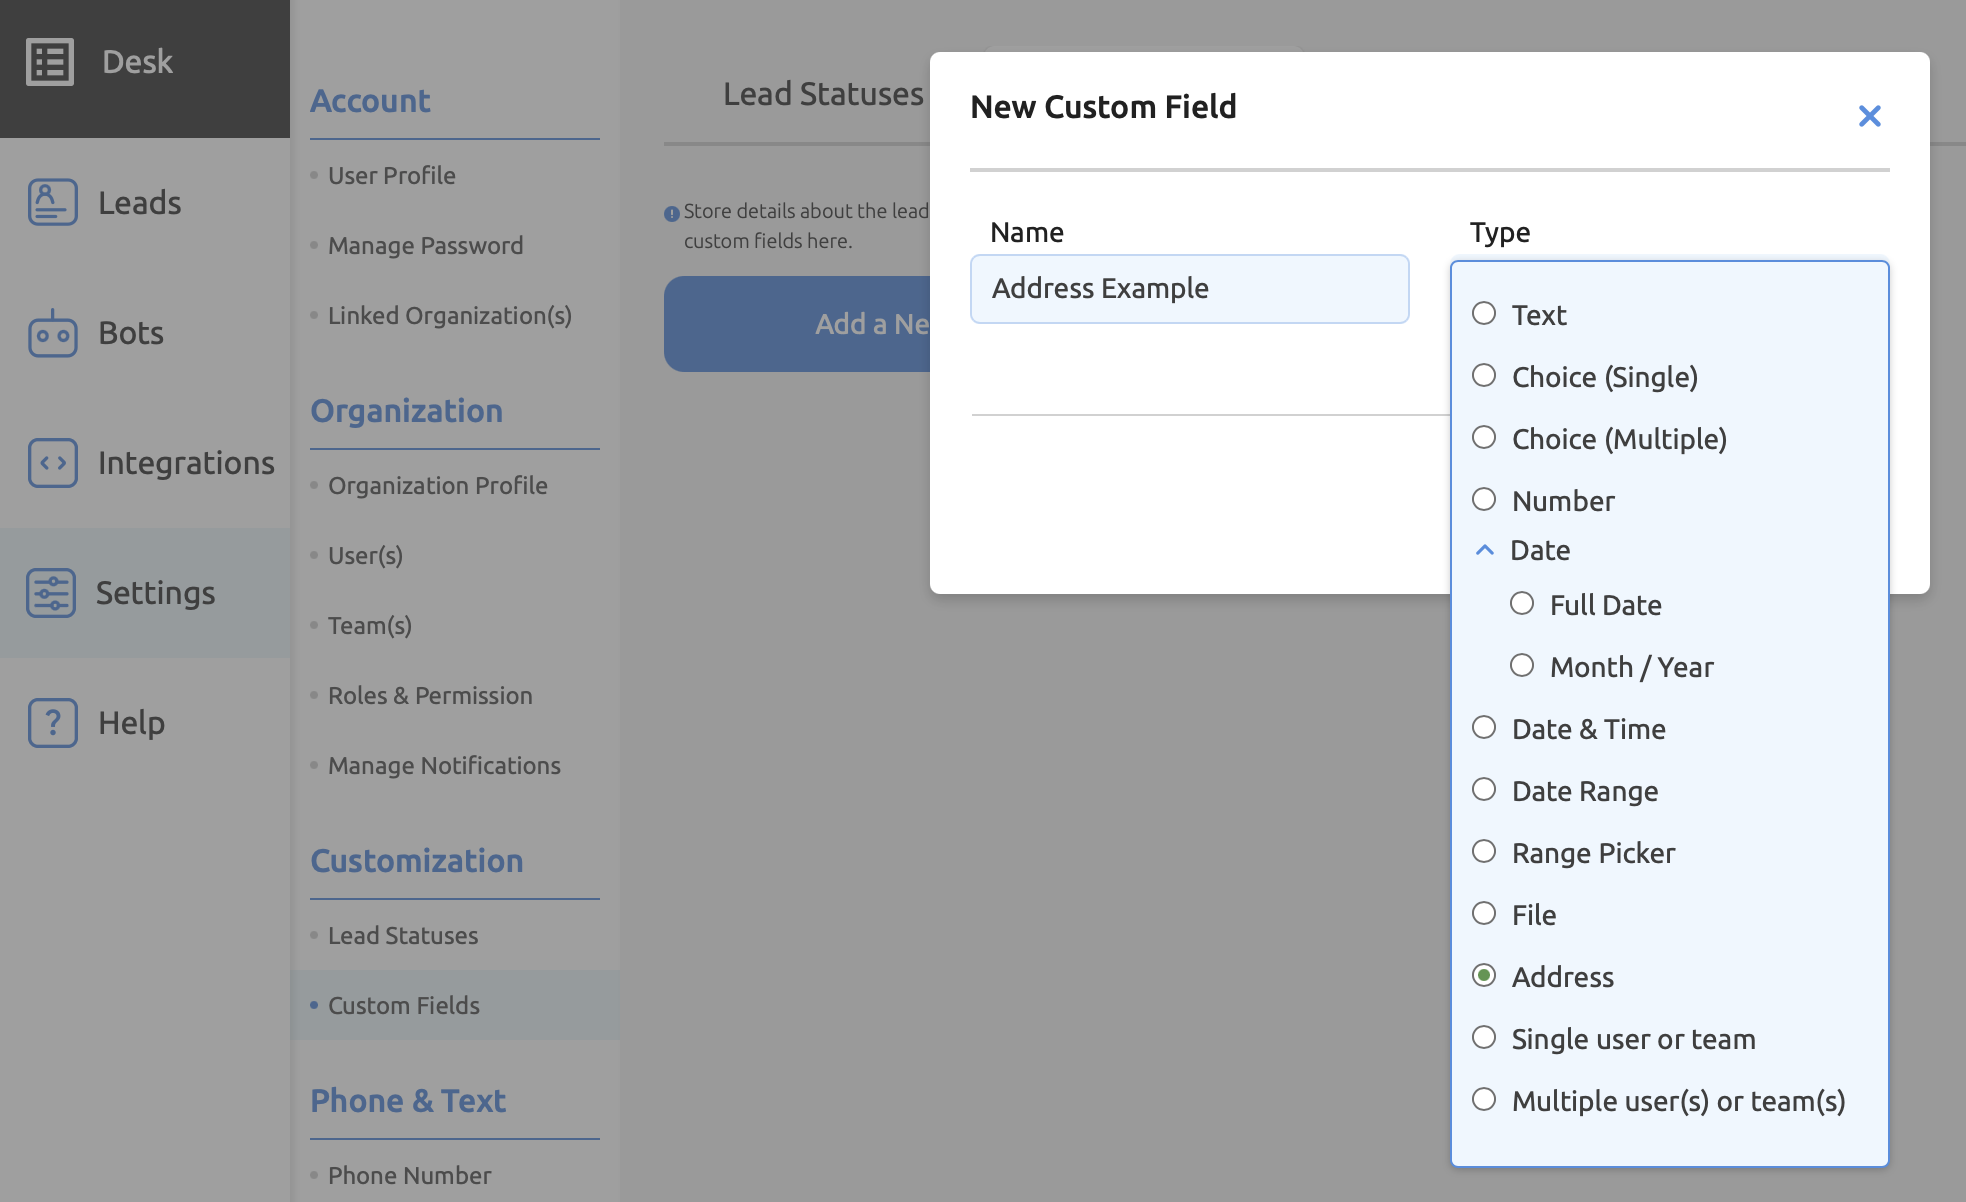
Address
Store address in the correct format with autocomplete.
How to Create a Custom Field to Add Addresses:
1. Go to the "settings" section of the Intaker dashboard.
2. Select "custom fields."
3. Click the "add new" button to enter the name and field type as "address."
Remember to save. Next time you visit the lead profile, a text box will appear where you can enter an address.
Caution:
- Wait a second so the autocomplete feature can pull up all the addresses.
- If the autocomplete feature can't find the address, select "enter the address manually."
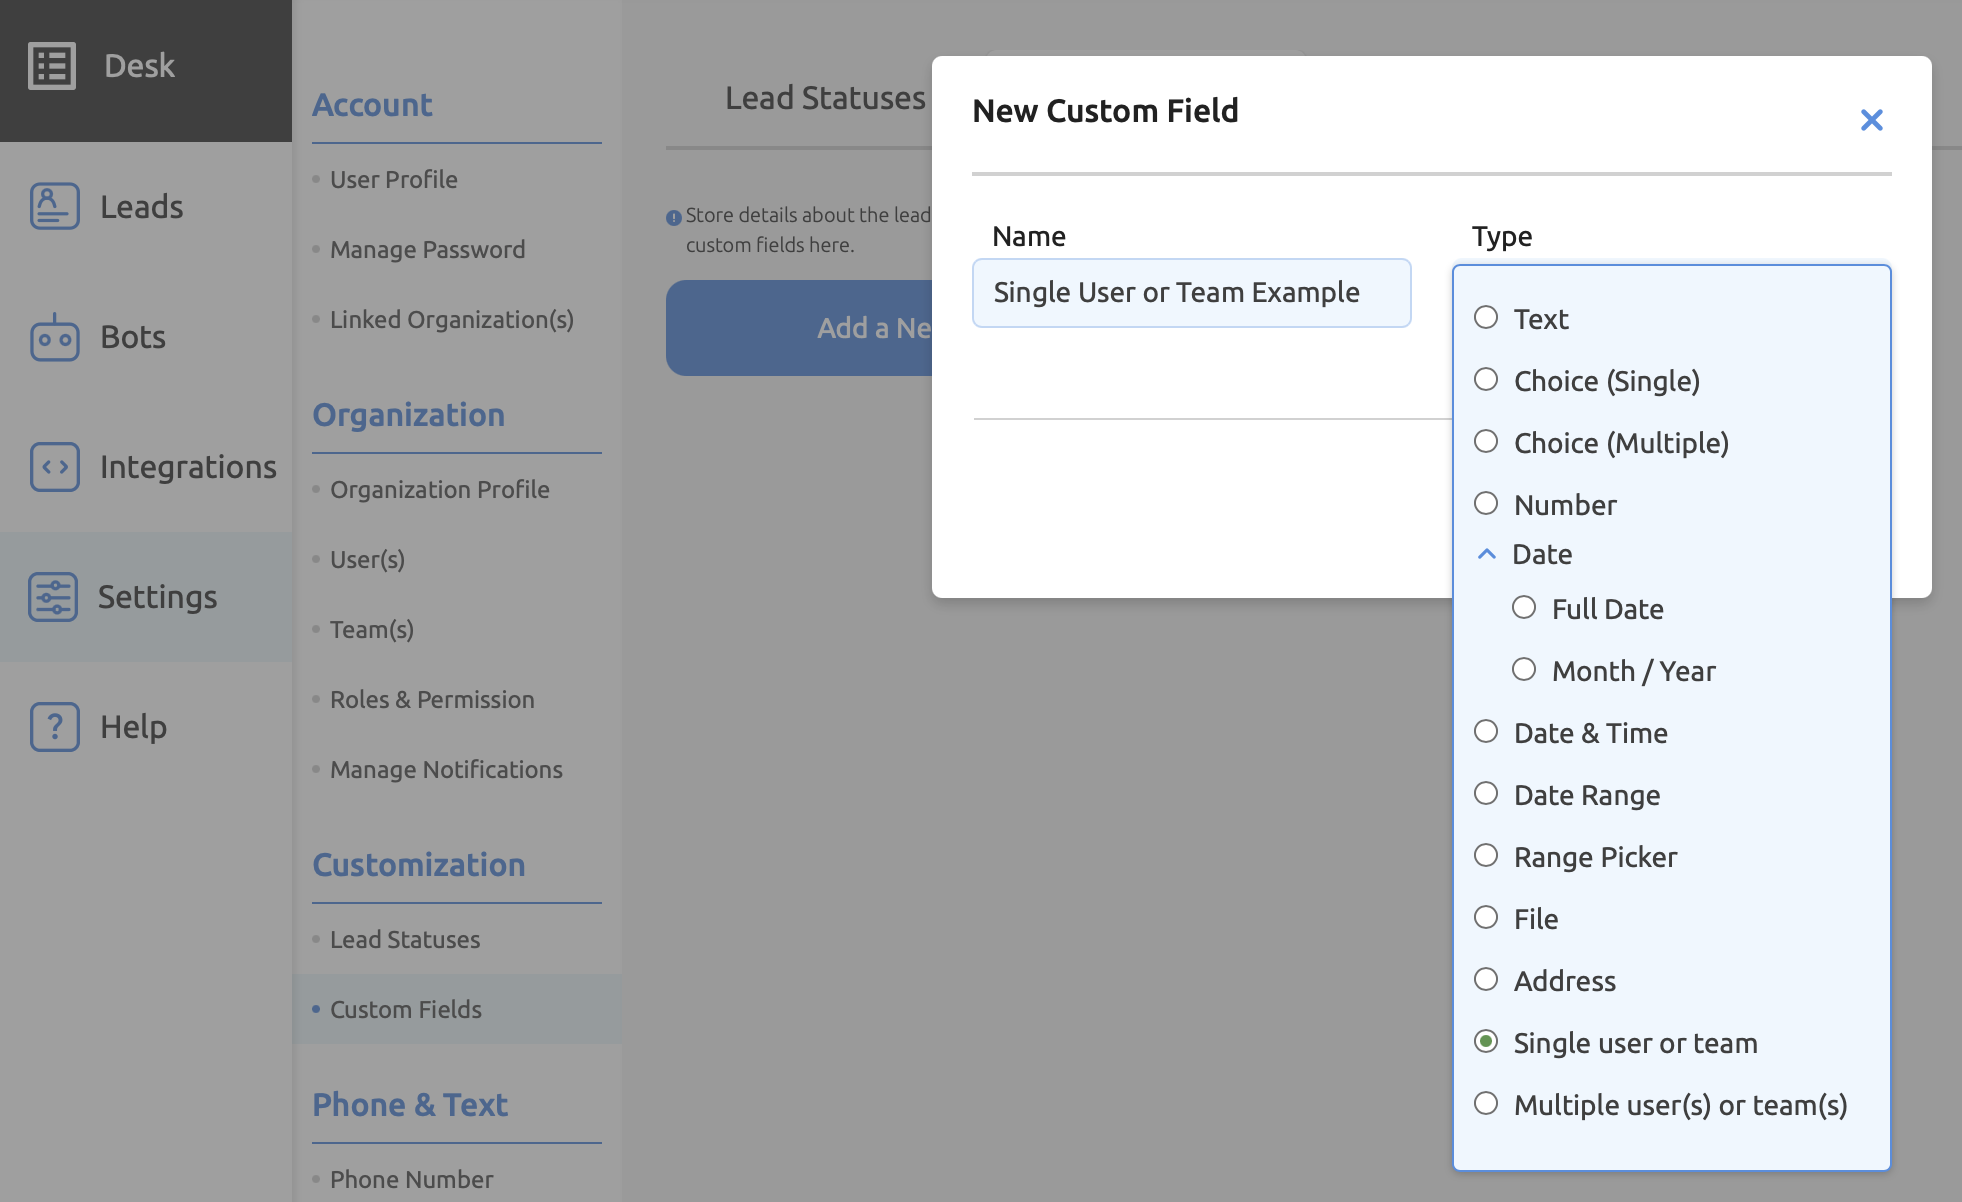
Single User or Team
Select one user or team from all users and teams in the organization.
How to Add Single Users or Teams with Custom Fields:
1. Go to the "settings" section of the Intaker dashboard.
2. Select "custom fields."
3. Click the "add new" button to enter the name and field type as "single user or team."
Remember to save. Next time you visit the lead profile, you will be able to select a user or team from a drop-down menu.
Multiple User(s) or Team(s)
Select multiple users or teams from all users and teams in the organization.
How to Add Multiple Users or Teams with Custom Fields:
1. Go to the "settings" section of the Intaker dashboard.
2. Select "custom fields."
3. Click the "add new" button to enter the name and field type as "multiple user(s) or team(s)."
Remember to save. Next time you visit the lead profile, you will be able to select multiple users or teams from a drop-down menu.
Pro Tip:
Let's imagine you need to store the name of the involved attorney(s) in every lead. You can create a Multiple User(s) or Team(s) custom field and conveniently select a user in your organization using a drop-down.
